
Heute im letzten Teil von „Hyperion, die Ambilight-Alternative“ möchte ich auf die Programmierung eingehen. Natürlich beschreibe ich hier auf intux.de den Linux-Weg, mit Zugang zum Raspberry Pi (Modell B) via SSH und SFTP. Das Ganze funktioniert selbstverständlich auch mit anderen Systemen wie Windows. Hierzu empfehle ich Tools wie PuTTY und/oder FileZilla.
Da ich einen Fushicai-Grabber (Logilink) einsetze, konnte ich mit dem aktuellen Image von Raspbian arbeiten. Dieses kostenlose Image läd man von der Seite http://www.raspberrypi.org/downloads/ herrunter. Das Build habe ich in mein Home-Verzeichnis entpackt und wie folgt auf die SD-Karte für mein Hyperion-Steuergerät Raspberry Pi gespielt.
|
1 |
sudo dd if=/home/intux/2015-02-16-raspbian-wheezy.img of=/dev/mmcblk0 bs=1M |
Hier muss natürlich der Name des Home-Verzeichnisses an das eigene System angepasst werden, will man das Projekt am heimischen Rechner ebenfalls so nachbauen.
Im Anschluss wird die SD in den Raspberry Pi eingelegt und dieser gestartet. Eine Tastatur muss natürlich für den ersten Start an den RasPI angeschlossen sein. Später kann man dann bequemer vom PC oder Notekook über SSH auf das Gerät zugreifen.
Beim ersten Start von Raspbian auf dem Pi kommt man in das Konfigurationsmenü. Hierbei ist das Dateisystem über Punkt 1 zu erweitern und über Punkt 8 SSH und SPI zu aktivieren.
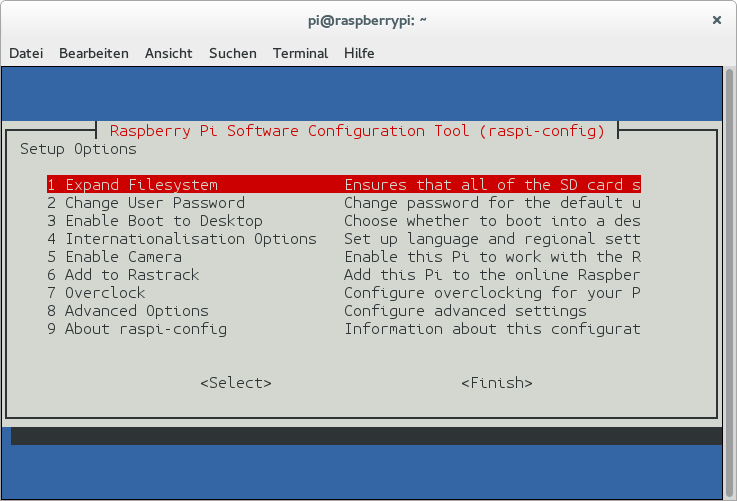
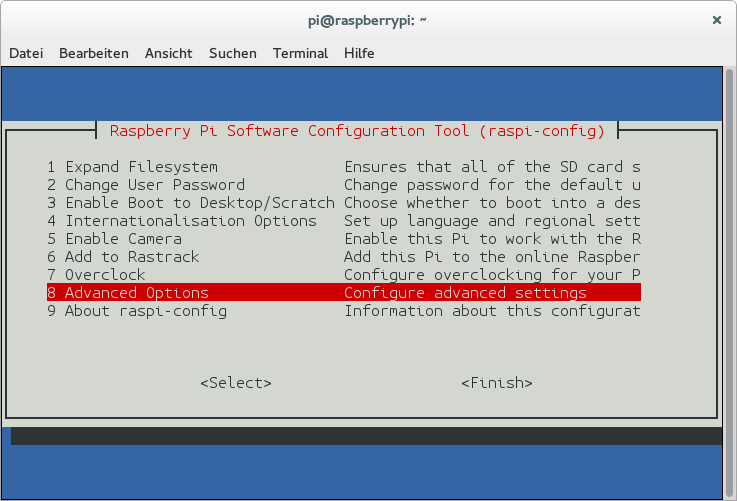

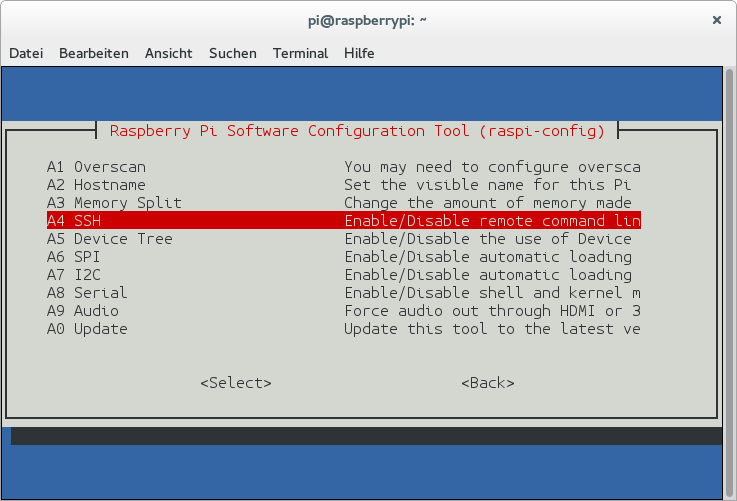
Ist das erledigt bestätigt man mit Finish und startet den Pi neu.
Nach dem Neustart führt man ein
|
1 |
sudo apt-get update && sudo apt-get upgrade |
durch, um das System zu aktualisieren. Sicherheitshalber startet man den Raspberry Pi mit
|
1 |
sudo reboot |
nochmals neu. Nach der Eingabe
|
1 |
lsusb |
erscheint der Fushicai-Grabber ID 1b71:3002 wie in der Abbildung zu sehen ist in der Auflistung.

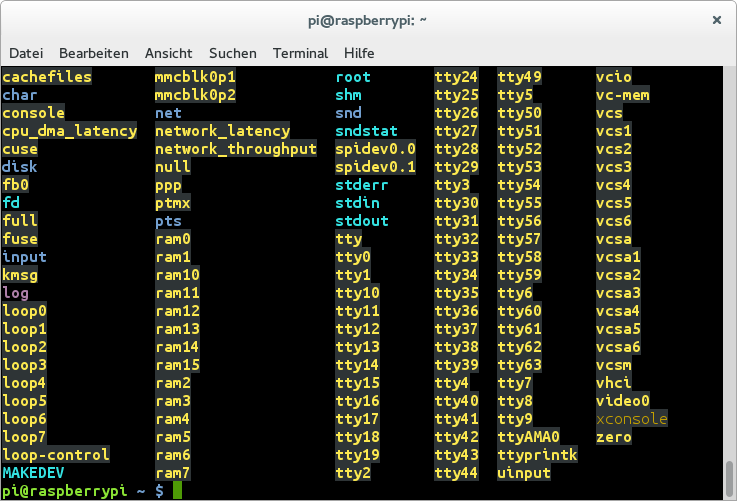
Gibt man
|
1 |
ls /dev |
ein, sollte nun spidev0.0 und video0 hier zu sehen sein.
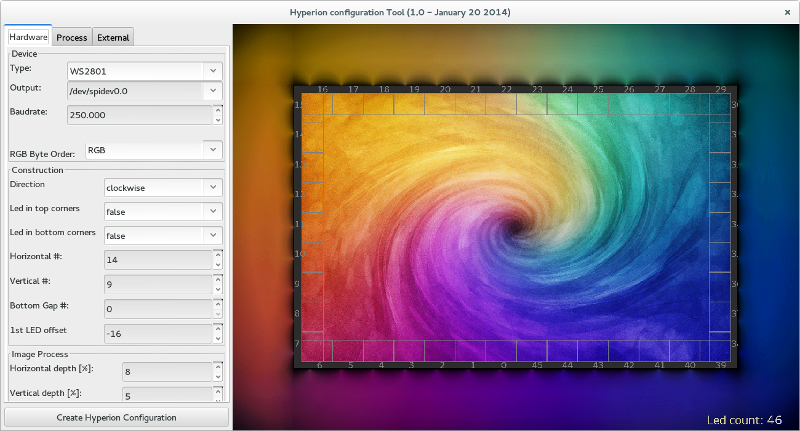
Das Programm HyperCon ist nun auf den PC zu laden und auszuführen. Hierbei muss Java installiert sein um HyperCon ausführen zu können. Man stellt im Programm die Anzahl der LEDs, die Anordnung etc. ein. Auf der Abbildung sieht man nun meine Vorgaben für 46 Leuchten (42 Zoll). Diese Konfigurationsdatei wird auf dem PC vorzugsweise in Home gespeichert.
Nun wird das Gegenstück Hyperion, zur Steuerung der LEDs, auf dem Pi installiert.
|
1 2 3 4 |
cd /tmp wget -N raw.github.com/tvdzwan/hyperion/master/bin/install_hyperion.sh chmod +x install_hyperion.sh sudo ./install_hyperion.sh |
|
1 |
cd /home/pi |
Alle Voraussetzungen sind nun geschaffen und man muss nur noch ein wenig konfigurieren!
Ein Screenshot des vom Grabber ausgegebenen Bildes, mit dem Hyperion arbeitet, muss nun erstellt werden.
|
1 |
sudo hyperion-v4l2 --width 720 --height 576 --screenshot |
Die entsprechende screenshot.png liegt dann im Hauptverzeichnis /home/pi des Raspberry Pi. Um nun den Grabber richtig einzustellen, schaut man sich das Bild auf dem PC an. E ist es hilfreich den Screenshot via SFTP (z.B. mit Filezilla) auf den PC zu holen. Man beschneidet jetzt mit crop das Bild solange bis die schwarzen Streifen um das Bildschirmfoto verschwunden sind.
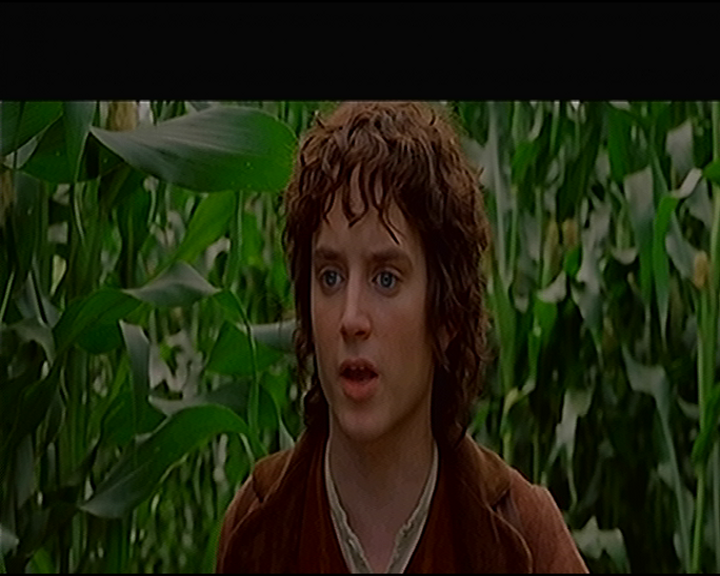
Bei mir sieht der Befehl dann wie folgt aus:
|
1 |
sudo hyperion-v4l2 --width 720 --height 576 --screenshot --frame-decimator 2 --size-decimator 0 --crop-left 18 --crop-right 5 --crop-top 90 --crop-bottom 0 |
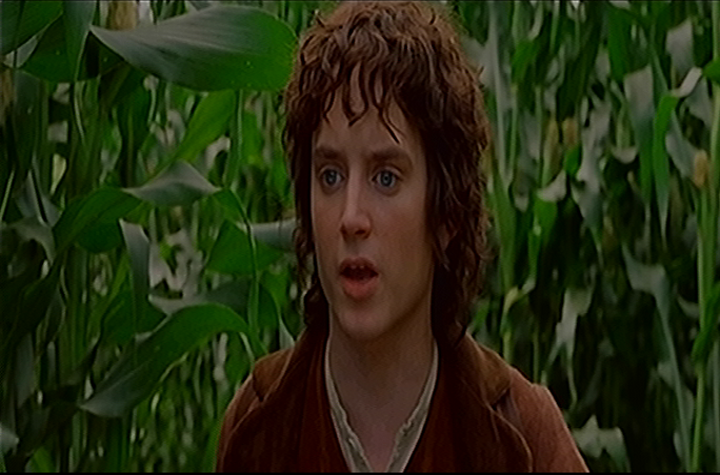
Um den Raspberry Pi nicht in die Knie zu zwingen, wird mit einer kleineren Auflösung zur Steuerung gearbeitet. Der passende Befehl wäre dann:
|
1 |
sudo hyperion-v4l2 --width 720 --height 576 --screenshot --frame-decimator 2 --size-decimator 8 --crop-left 18 --crop-right 5 --crop-top 90 --crop-bottom 0 |
Diese Werte editiert man im nachfolgenden Text und fügt das Ganze dann entsprechend so in die Konfigurationsdatei hyperion.config.json nach
|
1 2 3 4 |
// "boblightServer" : // { // "port" : 19333 // }, |
ein.
|
1 2 3 4 5 6 7 8 9 10 11 12 13 14 15 16 17 18 19 20 21 22 23 24 25 26 27 28 29 30 31 32 33 34 35 36 |
/// Configuration for the embedded V4L2 grabber /// * device : V4L2 Device to use [default="/dev/video0"] /// * input : V4L2 input to use [default=0] /// * standard : Video standard (no-change/PAL/NTSC) [default="no-change"] /// * width : V4L2 width to set [default=-1] /// * height : V4L2 height to set [default=-1] /// * frameDecimation : Frame decimation factor [default=2] /// * sizeDecimation : Size decimation factor [default=8] /// * priority : Hyperion priority channel [default=800] /// * mode : 3D mode to use 2D/3DSBS/3DTAB (note: no autodetection) [default="2D"] /// * cropLeft : Cropping from the left [default=0] /// * cropRight : Cropping from the right [default=0] /// * cropTop : Cropping from the top [default=0] /// * cropBottom : Cropping from the bottom [default=0] /// * redSignalThreshold : Signal threshold for the red channel between 0.0 and 1.0 [default=0.0] /// * greenSignalThreshold : Signal threshold for the green channel between 0.0 and 1.0 [default=0.0] /// * blueSignalThreshold : Signal threshold for the blue channel between 0.0 and 1.0 [default=0.0] "grabber-v4l2" : { "device" : "/dev/video0", "input" : 0, "standard" : "PAL", "width" : 720, "height" : 576, "frameDecimation" : 2, "sizeDecimation" : 8, "priority" : 1100, "mode" : "2D", "cropLeft" : 18, "cropRight" : 5, "cropTop" : 90, "cropBottom" : 0, "redSignalThreshold" : 0.1, "greenSignalThreshold" : 0.1, "blueSignalThreshold" : 0.1 }, |
Nun ist noch der framegrabber und der xbmcVideoChecker auszukommentieren (mit ///).
Meine fertige Config sieht nun so aus:
|
1 2 3 4 5 6 7 8 9 10 11 12 13 14 15 16 17 18 19 20 21 22 23 24 25 26 27 28 29 30 31 32 33 34 35 36 37 38 39 40 41 42 43 44 45 46 47 48 49 50 51 52 53 54 55 56 57 58 59 60 61 62 63 64 65 66 67 68 69 70 71 72 73 74 75 76 77 78 79 80 81 82 83 84 85 86 87 88 89 90 91 92 93 94 95 96 97 98 99 100 101 102 103 104 105 106 107 108 109 110 111 112 113 114 115 116 117 118 119 120 121 122 123 124 125 126 127 128 129 130 131 132 133 134 135 136 137 138 139 140 141 142 143 144 145 146 147 148 149 150 151 152 153 154 155 156 157 158 159 160 161 162 163 164 165 166 167 168 169 170 171 172 173 174 175 176 177 178 179 180 181 182 183 184 185 186 187 188 189 190 191 192 193 194 195 196 197 198 199 200 201 202 203 204 205 206 207 208 209 210 211 212 213 214 215 216 217 218 219 220 221 222 223 224 225 226 227 228 229 230 231 232 233 234 235 236 237 238 239 240 241 242 243 244 245 246 247 248 249 250 251 252 253 254 255 256 257 258 259 260 261 262 263 264 265 266 267 268 269 270 271 272 273 274 275 276 277 278 279 280 281 282 283 284 285 286 287 288 289 290 291 292 293 294 295 296 297 298 299 300 301 302 303 304 305 306 307 308 309 310 311 312 313 314 315 316 317 318 319 320 321 322 323 324 325 326 327 328 329 330 331 332 333 334 335 336 337 338 339 340 341 342 343 344 345 346 347 348 349 350 351 352 353 354 355 356 357 358 359 360 361 362 363 364 365 366 367 368 369 370 371 372 373 374 375 376 377 378 379 380 381 382 383 384 385 386 387 388 389 390 391 392 393 394 395 396 397 398 399 400 401 402 403 404 405 406 407 408 409 410 411 412 413 414 415 416 417 418 419 420 421 422 423 424 425 426 427 428 429 430 431 432 433 434 435 436 437 438 439 440 441 442 443 444 445 446 447 |
// Automatically generated configuration file for 'Hyperion daemon' // Generated by: HyperCon (The Hyperion deamon configuration file builder { /// Device configuration contains the following fields: /// * 'name' : The user friendly name of the device (only used for display purposes) /// * 'type' : The type of the device or leds (known types for now are 'ws2801', 'ldp8806', /// 'lpd6803', 'sedu', 'adalight', 'lightpack', 'test' and 'none') /// * 'output' : The output specification depends on selected device. This can for example be the /// device specifier, device serial number, or the output file name /// * 'rate' : The baudrate of the output to the device /// * 'colorOrder' : The order of the color bytes ('rgb', 'rbg', 'bgr', etc.). "device" : { "name" : "MyPi", "type" : "ws2801", "output" : "/dev/spidev0.0", "rate" : 250000, "colorOrder" : "rgb" }, /// Color manipulation configuration used to tune the output colors to specific surroundings. /// The configuration contains a list of color-transforms. Each transform contains the /// following fields: /// * 'id' : The unique identifier of the color transformation (eg 'device_1') /// * 'leds' : The indices (or index ranges) of the leds to which this color transform applies /// (eg '0-5, 9, 11, 12-17'). The indices are zero based. /// * 'hsv' : The manipulation in the Hue-Saturation-Value color domain with the following /// tuning parameters: /// - 'saturationGain' The gain adjustement of the saturation /// - 'valueGain' The gain adjustement of the value /// * 'red'/'green'/'blue' : The manipulation in the Red-Green-Blue color domain with the /// following tuning parameters for each channel: /// - 'threshold' The minimum required input value for the channel to be on /// (else zero) /// - 'gamma' The gamma-curve correction factor /// - 'blacklevel' The lowest possible value (when the channel is black) /// - 'whitelevel' The highest possible value (when the channel is white) /// /// Next to the list with color transforms there is also a smoothing option. /// * 'smoothing' : Smoothing of the colors in the time-domain with the following tuning /// parameters: /// - 'type' The type of smoothing algorithm ('linear' or 'none') /// - 'time_ms' The time constant for smoothing algorithm in milliseconds /// - 'updateFrequency' The update frequency of the leds in Hz "color" : { "transform" : [ { "id" : "default", "leds" : "*", "hsv" : { "saturationGain" : 1.0000, "valueGain" : 1.0000 }, "red" : { "threshold" : 0.0000, "gamma" : 1.0000, "blacklevel" : 0.0000, "whitelevel" : 1.0000 }, "green" : { "threshold" : 0.0000, "gamma" : 1.0000, "blacklevel" : 0.0000, "whitelevel" : 1.0000 }, "blue" : { "threshold" : 0.0000, "gamma" : 1.0000, "blacklevel" : 0.0000, "whitelevel" : 1.0000 } } ], "smoothing" : { "type" : "none", "time_ms" : 200, "updateFrequency" : 20.0000 } }, /// The configuration for each individual led. This contains the specification of the area /// averaged of an input image for each led to determine its color. Each item in the list /// contains the following fields: /// * index: The index of the led. This determines its location in the string of leds; zero /// being the first led. /// * hscan: The fractional part of the image along the horizontal used for the averaging /// (minimum and maximum inclusive) /// * vscan: The fractional part of the image along the vertical used for the averaging /// (minimum and maximum inclusive) "leds" : [ { "index" : 0, "hscan" : { "minimum" : 0.4286, "maximum" : 0.5000 }, "vscan" : { "minimum" : 0.9200, "maximum" : 1.0000 } }, { "index" : 1, "hscan" : { "minimum" : 0.3571, "maximum" : 0.4286 }, "vscan" : { "minimum" : 0.9200, "maximum" : 1.0000 } }, { "index" : 2, "hscan" : { "minimum" : 0.2857, "maximum" : 0.3571 }, "vscan" : { "minimum" : 0.9200, "maximum" : 1.0000 } }, { "index" : 3, "hscan" : { "minimum" : 0.2143, "maximum" : 0.2857 }, "vscan" : { "minimum" : 0.9200, "maximum" : 1.0000 } }, { "index" : 4, "hscan" : { "minimum" : 0.1429, "maximum" : 0.2143 }, "vscan" : { "minimum" : 0.9200, "maximum" : 1.0000 } }, { "index" : 5, "hscan" : { "minimum" : 0.0714, "maximum" : 0.1429 }, "vscan" : { "minimum" : 0.9200, "maximum" : 1.0000 } }, { "index" : 6, "hscan" : { "minimum" : 0.0000, "maximum" : 0.0714 }, "vscan" : { "minimum" : 0.9200, "maximum" : 1.0000 } }, { "index" : 7, "hscan" : { "minimum" : 0.0000, "maximum" : 0.0500 }, "vscan" : { "minimum" : 0.8889, "maximum" : 1.0000 } }, { "index" : 8, "hscan" : { "minimum" : 0.0000, "maximum" : 0.0500 }, "vscan" : { "minimum" : 0.7778, "maximum" : 0.8889 } }, { "index" : 9, "hscan" : { "minimum" : 0.0000, "maximum" : 0.0500 }, "vscan" : { "minimum" : 0.6667, "maximum" : 0.7778 } }, { "index" : 10, "hscan" : { "minimum" : 0.0000, "maximum" : 0.0500 }, "vscan" : { "minimum" : 0.5556, "maximum" : 0.6667 } }, { "index" : 11, "hscan" : { "minimum" : 0.0000, "maximum" : 0.0500 }, "vscan" : { "minimum" : 0.4444, "maximum" : 0.5556 } }, { "index" : 12, "hscan" : { "minimum" : 0.0000, "maximum" : 0.0500 }, "vscan" : { "minimum" : 0.3333, "maximum" : 0.4444 } }, { "index" : 13, "hscan" : { "minimum" : 0.0000, "maximum" : 0.0500 }, "vscan" : { "minimum" : 0.2222, "maximum" : 0.3333 } }, { "index" : 14, "hscan" : { "minimum" : 0.0000, "maximum" : 0.0500 }, "vscan" : { "minimum" : 0.1111, "maximum" : 0.2222 } }, { "index" : 15, "hscan" : { "minimum" : 0.0000, "maximum" : 0.0500 }, "vscan" : { "minimum" : 0.0000, "maximum" : 0.1111 } }, { "index" : 16, "hscan" : { "minimum" : 0.0000, "maximum" : 0.0714 }, "vscan" : { "minimum" : 0.0000, "maximum" : 0.0800 } }, { "index" : 17, "hscan" : { "minimum" : 0.0714, "maximum" : 0.1429 }, "vscan" : { "minimum" : 0.0000, "maximum" : 0.0800 } }, { "index" : 18, "hscan" : { "minimum" : 0.1429, "maximum" : 0.2143 }, "vscan" : { "minimum" : 0.0000, "maximum" : 0.0800 } }, { "index" : 19, "hscan" : { "minimum" : 0.2143, "maximum" : 0.2857 }, "vscan" : { "minimum" : 0.0000, "maximum" : 0.0800 } }, { "index" : 20, "hscan" : { "minimum" : 0.2857, "maximum" : 0.3571 }, "vscan" : { "minimum" : 0.0000, "maximum" : 0.0800 } }, { "index" : 21, "hscan" : { "minimum" : 0.3571, "maximum" : 0.4286 }, "vscan" : { "minimum" : 0.0000, "maximum" : 0.0800 } }, { "index" : 22, "hscan" : { "minimum" : 0.4286, "maximum" : 0.5000 }, "vscan" : { "minimum" : 0.0000, "maximum" : 0.0800 } }, { "index" : 23, "hscan" : { "minimum" : 0.5000, "maximum" : 0.5714 }, "vscan" : { "minimum" : 0.0000, "maximum" : 0.0800 } }, { "index" : 24, "hscan" : { "minimum" : 0.5714, "maximum" : 0.6429 }, "vscan" : { "minimum" : 0.0000, "maximum" : 0.0800 } }, { "index" : 25, "hscan" : { "minimum" : 0.6429, "maximum" : 0.7143 }, "vscan" : { "minimum" : 0.0000, "maximum" : 0.0800 } }, { "index" : 26, "hscan" : { "minimum" : 0.7143, "maximum" : 0.7857 }, "vscan" : { "minimum" : 0.0000, "maximum" : 0.0800 } }, { "index" : 27, "hscan" : { "minimum" : 0.7857, "maximum" : 0.8571 }, "vscan" : { "minimum" : 0.0000, "maximum" : 0.0800 } }, { "index" : 28, "hscan" : { "minimum" : 0.8571, "maximum" : 0.9286 }, "vscan" : { "minimum" : 0.0000, "maximum" : 0.0800 } }, { "index" : 29, "hscan" : { "minimum" : 0.9286, "maximum" : 1.0000 }, "vscan" : { "minimum" : 0.0000, "maximum" : 0.0800 } }, { "index" : 30, "hscan" : { "minimum" : 0.9500, "maximum" : 1.0000 }, "vscan" : { "minimum" : 0.0000, "maximum" : 0.1111 } }, { "index" : 31, "hscan" : { "minimum" : 0.9500, "maximum" : 1.0000 }, "vscan" : { "minimum" : 0.1111, "maximum" : 0.2222 } }, { "index" : 32, "hscan" : { "minimum" : 0.9500, "maximum" : 1.0000 }, "vscan" : { "minimum" : 0.2222, "maximum" : 0.3333 } }, { "index" : 33, "hscan" : { "minimum" : 0.9500, "maximum" : 1.0000 }, "vscan" : { "minimum" : 0.3333, "maximum" : 0.4444 } }, { "index" : 34, "hscan" : { "minimum" : 0.9500, "maximum" : 1.0000 }, "vscan" : { "minimum" : 0.4444, "maximum" : 0.5556 } }, { "index" : 35, "hscan" : { "minimum" : 0.9500, "maximum" : 1.0000 }, "vscan" : { "minimum" : 0.5556, "maximum" : 0.6667 } }, { "index" : 36, "hscan" : { "minimum" : 0.9500, "maximum" : 1.0000 }, "vscan" : { "minimum" : 0.6667, "maximum" : 0.7778 } }, { "index" : 37, "hscan" : { "minimum" : 0.9500, "maximum" : 1.0000 }, "vscan" : { "minimum" : 0.7778, "maximum" : 0.8889 } }, { "index" : 38, "hscan" : { "minimum" : 0.9500, "maximum" : 1.0000 }, "vscan" : { "minimum" : 0.8889, "maximum" : 1.0000 } }, { "index" : 39, "hscan" : { "minimum" : 0.9286, "maximum" : 1.0000 }, "vscan" : { "minimum" : 0.9200, "maximum" : 1.0000 } }, { "index" : 40, "hscan" : { "minimum" : 0.8571, "maximum" : 0.9286 }, "vscan" : { "minimum" : 0.9200, "maximum" : 1.0000 } }, { "index" : 41, "hscan" : { "minimum" : 0.7857, "maximum" : 0.8571 }, "vscan" : { "minimum" : 0.9200, "maximum" : 1.0000 } }, { "index" : 42, "hscan" : { "minimum" : 0.7143, "maximum" : 0.7857 }, "vscan" : { "minimum" : 0.9200, "maximum" : 1.0000 } }, { "index" : 43, "hscan" : { "minimum" : 0.6429, "maximum" : 0.7143 }, "vscan" : { "minimum" : 0.9200, "maximum" : 1.0000 } }, { "index" : 44, "hscan" : { "minimum" : 0.5714, "maximum" : 0.6429 }, "vscan" : { "minimum" : 0.9200, "maximum" : 1.0000 } }, { "index" : 45, "hscan" : { "minimum" : 0.5000, "maximum" : 0.5714 }, "vscan" : { "minimum" : 0.9200, "maximum" : 1.0000 } } ], /// The black border configuration, contains the following items: /// * enable : true if the detector should be activated /// * threshold : Value below which a pixel is regarded as black (value between 0.0 and 1.0) "blackborderdetector" : { "enable" : true, "threshold" : 0.01 }, /// The configuration of the effect engine, contains the following items: /// * paths : An array with absolute location(s) of directories with effects /// * bootsequence : The effect selected as 'boot sequence' "effects" : { "paths" : [ "/opt/hyperion/effects" ] }, "bootsequence" : { "effect" : "Rainbow swirl fast", "duration_ms" : 3000 }, /// The configuration for the frame-grabber, contains the following items: /// * width : The width of the grabbed frames [pixels] /// * height : The height of the grabbed frames [pixels] /// * frequency_Hz : The frequency of the frame grab [Hz] ///"framegrabber" : ///{ /// "width" : 64, /// "height" : 64, /// "frequency_Hz" : 10.0 ///}, /// The configuration of the XBMC connection used to enable and disable the frame-grabber. Contains the following fields: /// * xbmcAddress : The IP address of the XBMC-host /// * xbmcTcpPort : The TCP-port of the XBMC-server /// * grabVideo : Flag indicating that the frame-grabber is on(true) during video playback /// * grabPictures : Flag indicating that the frame-grabber is on(true) during picture show /// * grabAudio : Flag indicating that the frame-grabber is on(true) during audio playback /// * grabMenu : Flag indicating that the frame-grabber is on(true) in the XBMC menu /// * grabScreensaver : Flag indicating that the frame-grabber is on(true) when XBMC is on screensaver /// * enable3DDetection : Flag indicating that the frame-grabber should switch to a 3D compatible modus if a 3D video is playing ///"xbmcVideoChecker" : ///{ /// "xbmcAddress" : "127.0.0.1", /// "xbmcTcpPort" : 9090, /// "grabVideo" : true, /// "grabPictures" : true, /// "grabAudio" : true, /// "grabMenu" : false, /// "grabScreensaver" : true, /// "enable3DDetection" : true ///}, /// The configuration of the Json server which enables the json remote interface /// * port : Port at which the json server is started "jsonServer" : { "port" : 19444 }, /// The configuration of the Proto server which enables the protobuffer remote interface /// * port : Port at which the protobuffer server is started "protoServer" : { "port" : 19445 }, /// The configuration of the boblight server which enables the boblight remote interface /// * port : Port at which the boblight server is started // "boblightServer" : // { // "port" : 19333 // }, /// Configuration for the embedded V4L2 grabber /// * device : V4L2 Device to use [default="/dev/video0"] /// * input : V4L2 input to use [default=0] /// * standard : Video standard (no-change/PAL/NTSC) [default="no-change"] /// * width : V4L2 width to set [default=-1] /// * height : V4L2 height to set [default=-1] /// * frameDecimation : Frame decimation factor [default=2] /// * sizeDecimation : Size decimation factor [default=8] /// * priority : Hyperion priority channel [default=800] /// * mode : 3D mode to use 2D/3DSBS/3DTAB (note: no autodetection) [default="2D"] /// * cropLeft : Cropping from the left [default=0] /// * cropRight : Cropping from the right [default=0] /// * cropTop : Cropping from the top [default=0] /// * cropBottom : Cropping from the bottom [default=0] /// * redSignalThreshold : Signal threshold for the red channel between 0.0 and 1.0 [default=0.0] /// * greenSignalThreshold : Signal threshold for the green channel between 0.0 and 1.0 [default=0.0] /// * blueSignalThreshold : Signal threshold for the blue channel between 0.0 and 1.0 [default=0.0] "grabber-v4l2" : { "device" : "/dev/video0", "input" : 0, "standard" : "PAL", "width" : 720, "height" : 576, "frameDecimation" : 2, "sizeDecimation" : 8, "priority" : 1100, "mode" : "2D", "cropLeft" : 18, "cropRight" : 5, "cropTop" : 90, "cropBottom" : 0, "redSignalThreshold" : 0.1, "greenSignalThreshold" : 0.1, "blueSignalThreshold" : 0.1 }, "endOfJson" : "endOfJson" } |
Die fertige Datei läd man dann via SFTP nach /home/pi. Von da wird sie via SSH nach /opt/hyperion/config in das entsprechende Config-Verzeichnis verschoben, da man mit SFTP standardmäßig keine root-Rechte hat, um in das System zu schreiben.
|
1 |
sudo mv /home/pi/hyperion.config.json /opt/hyperion/config |
Jetzt startet man den RasPi neu und der Ambi-Clon nimmt seine Arbeit auf!
|
1 |
sudo reboot |
Nachtrag
Um am laufenden System erneut einen Screenshot zu erstellen, muss der Daemon gestoppt werden. Dies erledigt man mit
|
1 |
sudo /etc/init.d/hyperion stop |
Mit einem
|
1 |
sudo reboot |
wird der Daemon wieder gestartet.
Nachtrag
Nachdem ich den HDMI-Konverter nochmals austauschen musste (HDMI zu AV Konverter), habe ich aufgrund eines neuen Screenshots mit folgenden Crop-Werten gearbeitet.
|
1 2 3 4 |
"cropLeft" : 20, "cropRight" : 20, "cropTop" : 5, "cropBottom" : 5, |
Viel Spaß!


Hallo
habe alles gemach wie beschrieben. funktioniert super. tolle anleitung
danke (;
nur habe ich folgende problem
1. wie bekomme ich ein schönes weiß hin?
habe schon alles getestet mit der app (zur info: die kostet bei iphone 3,99€) aber hat immer einen blaustich dabei. wird nie wirklich weiß
2. z.b. bei avatar bei der feuerszene wird bei mir das feuer eher grün als rot/orange
aber sonst passt eig. alles (auch mit den testbildern)
4. wie weit stehen eure tv’s von der wand weg?
5. wie bekommt man so ein ergebniss hin???
https://m.youtube.com/watch?v=bLLoOMHKgC4
6. die helligkeit verändert sich auch nicht wirklich egal was ich einstelle
7. leds schalten nicht aus wenn ich kodi herunterfahre muss ich extra stecker ziehen und wenn ich wieder anstecke, schalten sich die leds nach einiger zeit wieder an
Hallo Philipp,
wie du siehst ist das Ganze schon fast ein Jahr her. Es ging mir nie um einen produktiven Einsatz, deshalb habe ich nach der Realisierung alle Komponenten verkauft nach einer gewissen Testphase verkauft.
zu 1. Hier kannst Du nur mit Hyperion testen und die Einstellungen vornehmen. Ich hatte gemerkt, dass es beim Konverter Unterschiede gibt, die sich auch auf das Farbbild auswirken. Hier eine Auflistung der von mir verwendeten Komponenten: https://www.intux.de/2015/03/hyperion-die-ambilight-alternative-zusammenfassung/
zu 2. Auch hier kann ich nur auf Hyperion verweisen. Meine Einstellung war: RGB Byte Order: RGB
Das muss an die entsprechenden LEDs angepasst werden.
zu 4. Meiner stand 25cm von der Wand. Idealerweise sollte er sich fast direkt an der Wand befinden. Dabei ist es für den Effekt dienlich, wenn kein Schrank etc. nah am TV steht und die Wand weiß ist. Hat man in unmittelbarer Nähe hellbraune Möbel, so reflektiert weißes Licht gelblich.
zu 5. Hier handelt es sich um ein anderes System.
zu 6. Dazu kann ich nichts sagen. Ich hatte mit der Helligkeit keine Probleme. Ich weiß auch nicht, ob die einstellbar ist. Ich kann das leider nicht mehr überprüfen. Tut mir leid.
zu 7. Das Problem hatte ich auch. Nach dem Wechsel auf den neuen Konverter ging das dann aber. Siehe: https://www.intux.de/2015/03/hdmi-zu-av-konverter/
Das Ganze ist aber mehr ein Glücksspiel! Hier kann ich keine Garantie für ein Gelingen geben, da ich nicht weiß was momentan im Handel ist. Ich hoffe die Links sind noch aktuell.
Hier noch schnell ein Link:
http://www.forum-raspberrypi.de/
Hier wird dir sicher weitergeholfen! Die Jungs sind kompetent, die sich genau mit dieser Materie beschäftigen.
Ich wünsche ein gutes Gelingen!
[…] Hyperion, die Ambilight-Alternative – Teil 1 Hyperion, die Ambilight-Alternative – Teil 2 Hyperion, die Ambilight-Alternative – Teil 3 Hyperion, die Ambilight-Alternative – Teil 4 […]